Thursday, 17 November 2016

Halloween

Hi everyone!

It's a little belated, but I've finally got round to collating all the photos of the masks we made for our Halloween workshop! Everyone did such an awesome job, they all look so amazing. If you're interested in making your own mask, literally all you need is a plain mask (you can find them easily and cheaply on Amazon and Ebay), some paint, ribbons and glitter. Then decorate away!


Hope everyone enjoyed the workshop and had a great Halloween!

Happy crafting :)

Friday, 21 October 2016

Tutorial: Felt Hairclips

Hey everyone!

In this week's workshop we made a variety of different hairclips - bows and flowers! If you missed the session but still want a go at crafting your own, or simply want a refresher of the instructions, I've put together some tutorial information for you.
Bows2

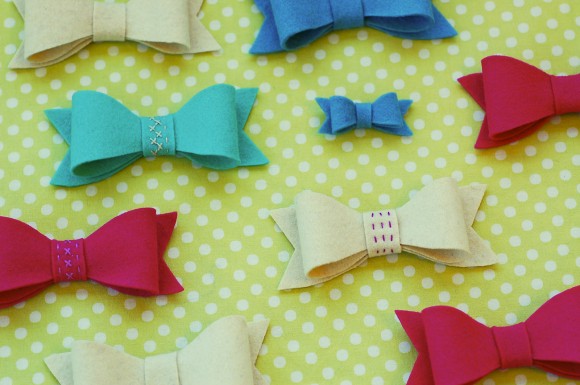
To make some cute bows like these, follow the link to Oliver and S, where you'll find all the instructions. You simply need the pattern, which can be found by enlarging and printing out the photo above or as a download on the website, felt, a needle and thread. You can then embellish them as you wish and glue them to hairclips!


In the above photos, you can see some visual tutorials on how to make your own felt flowers! These can then be turned into pretty badges and hairclips. Again, all the materials you will need are felt, a needle and thread and some decorations like buttons.

Happy crafting!

Wednesday, 12 October 2016

Tutorial: Scratch Off Maps

Hey everyone!

In last week's workshop, we made scratch off maps. These are laminated maps with the countries of the world painted over, then when you have visited a country, you simply get a penny or use your fingernail to scratch the paint off, revealing the country underneath! It's a great way to document everywhere you've been to, perfect for people who love to travel.

For those of you who didn't manage to attend the workshop, here is a video tutorial documenting how to make your own scratch off map, including the materials you will need.

To get your creative juices flowing, here are a few photos from the workshop so you get an idea for how the finished product should look:


Happy crafting!

Wednesday, 28 September 2016

Tutorial: Pencil Cases

Hi everyone!

I hope that you all managed to attend our taster session yesterday, but for those of you that couldn't make it, I've put together a tutorial so you can have a go at making your own pencil case! You can also find a video with all the instructions here if you need any extra guidance.

Materials:

-20x20cm piece of fabric (PVC is preferable but you can use anything - cotton, denim, cord, etc)
-1x23cm zip
-Thread
-Needle
-Masking Tape

Instructions:

1. With your fabric facing pattern-side up, masking tape your zip face-down, so that the edges of the zip and fabric line up

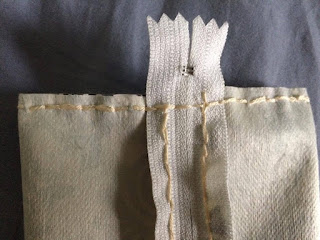
2. Using a running stitch, simply sew along the side of the zip. Once you reach the other end, turn and sew back the way you came, filling the gaps (see below)


3. Remove the masking tape from the zip, then fold the fabric in half so that the patterned side is touching, aligning the other side of the zip with the fabric. Masking tape the edges to keep it in place whilst you sew


4. Like the first side of the zip, sew along the zip from one side to the other and then back again


5. You should now have a tubular piece of fabric. Remove the masking tape from the sides of the fabric, then lay flat so the zip is central. Unzip the zip halfway, and masking tape the open zip ends to keep them together


6. Sew along one end of the pencil case


7. Sew along the other edge of the pencil case. You should now be left with a pencil case, which is inside out!


8. Open the zip all the way and turn the pencil case right side out, pushing out the corners


9. Ta-da! You have a lovely handmade pencil case :)

Thank you to everyone who came to our taster session. Next week we will be making scratch off maps, 7pm on Tuesday in the Seminar Room of the Wheldon Building. If you don't know where to go, just drop us a message via the Facebook page (link in the navigation bar above!)

Happy crafting everyone!


Monday, 26 September 2016

Serendipity 2016

Hi guys! A huge welcome to all our new members and, for returning members, welcome back!

It has been forever since a new blog post went up, but I thought I'd start the new uni year with a round-up of some photos from this year's Serendipity, which has been the most successful one the Craft and Sewing Society has had so far!

This year, we had some awesome freebies to give away to new students as they passed by. Keyrings, badges featuring five different designs and some fancy business cards:


It was amazing to see so many people out joining new societies; I'm looking forward to meeting everyone that has signed up to be a part of the Craft and Sewing Society this year.

Our first session of the year will be on Tuesday 27th September at 7pm in the seminar room of the Wheldon building, where we'll be making pencil cases. No previous crafting experience is necessary and all materials will be provided. It should be a good night!

If you are unsure where to meet us, there will be someone waiting outside Academi (the club at the bottom of the hill opposite Deiniol Library) who will pick you up, or simply drop us a message via the Facebook page (link in the navigation bar at the top).

Here's a few more photos from Serendipity:


Thank you for coming along, and we can't wait to see you all on Tuesday!


Wednesday, 17 February 2016

Tutorial: Marble Mugs

Hello everyone, and welcome to all our new members who joined at Serendipity 2! 

Hopefully you all enjoyed making marble mugs at yesterday's workshop, but if you couldn't make it down I've put together a tutorial so you can try on your own at home. 

Materials

-Plain mug (ideally white but any colour would work) 
-Nail varnish (1-4 colours depending on how colourful you'd like your mug to be!)
-Nail varnish remover
-Mixing bowl filled with water deep enough to sink your mug into

Instructions

1. In a circular/spiralling motion, pour a small amount of nail varnish into the water - repeat with other colours if using more than one. 

2. Wait a few seconds for the varnish to disperse in the water. 

3. Dip your mug into the water and swirl it round to collect as much nail varnish as possible. You could push the mug in bottom down, or put it in sideways - the decision is yours! 

4. Rest upside down on a piece of kitchen roll and allow to dry. 

5. Use nail varnish remover to clean the inside of your mug (and possibly your hands!) 

And...you're finished! Your very own marble mug. Just remember to wash them in cooler water (including before use to remove any nail varnish remover), and don't pop them in the microwave or dishwasher. 

Here are a few examples made at last night's session to help inspire you: 


Thank you for reading, and happy crafting! :) 

P.S. In next week's workshop we will be making bath bombs! It should be a fantastic session so do pop down to Academi at 7pm on Tuesday 23rd to give it a go!