Sunday, 29 November 2015

Christmas Fair

December is nearly upon us, which means only one thing... time to get into the Christmas spirit!

Unlike the supermarkets, which appear to start getting excited for the holiday season somewhere around mid-October, I've never been able to get into the Christmas mood until I open the first door of my advent calendar. However, since there are only a couple of days to go until December, I'd like to share with you some information about Bangor's upcoming Christmas market! 

This year, the market will be held on Friday 4th December in PJ Hall, Main Arts, from 12:00-17:00. The Bangor Craft and Sewing Society will have a stall where you can come along to buy our handmade goods, including dreamcatchers, jam jar tea-lights and felt bookmarks!


Last year we managed to raise £129.50 to put towards funding future workshops and keep our society going, as well as £80 for the Red Cross. This year, we hope to do even better! 

As well as our society, there will be dozens of other stalls that you can look round, selling a huge variety of jewellery, cards, baked goods, plants, decorations and hot food, to name just a few, so please feel free to pop along, say hi and check out what's on offer! It's a great opportunity to get a few Christmas presents crossed off your 'To Buy' list, or to get yourself a little something. 

We hope to see you there :) 

Friday, 6 November 2015

Learning to Sew

Hey everyone!

For those of you who know me, most will also know that I sew most of my own clothes. When people first hear this, a lot of them sound really surprised, which I suppose in the modern world of consumerism and fast fashion is pretty understandable. However, I'm here to tell you that sewing your own clothes is not as difficult as many people seem to think it is. I'm a completely self taught sewist, inspired to get to grips with learning how to use a sewing machine after watching the first series of The Great British Sewing Bee in 2013. I've been sewing for nearly two years now, with handmade clothes taking up more than 50% of the garments I wear on a regular basis.


'Colette Astoria' Sweatshirt

When I started, I had no clue what I was doing. All I knew was that I wanted to take a sewing machine, some thread and some fabric, and bring them together into something totally unique and that I would love to wear. Of course, my first few attempts were completely awful and have been buried in the bottom of my wardrobe ever since, but don't let this dishearten you! Look on these projects as a learning curve; every mistake you make is helping you to get better.


'By Hand London Flora' Dress

I basically started out by reading my sewing machine's manual from cover to cover. Sit with the machine in front of you, so you can physically touch and get to know each part of the machine as the manual takes you through it. Then, I read a few of Tilly and the Buttons' 'Learning to Sew' posts, which you can find here. Bored of theory by then, I jumped into the practical. Cheap fabric (sourced from Abakhan), a pattern from the Great British Sewing Bee book, and I was away. I wore the finished dress once. It had messy insides, it was too big, the fabric was sort of ugly...but the point is, I'd done it - I'd sat down and made something to wear using my own two hands.


'Tilly and the Buttons Arielle' Skirt

From then on, everything became a lot easier. Once you've got through your first project, the excitement and joy every time you finish something else just acts as the momentum to keep going. And every time I finished a new project, it was a little better than the last. I wear very few of those early garments nowadays, though I took great pride in wearing them at the time, and being able to tell my friends that I'd made what I was wearing myself. You'll probably do a similar thing. Most of what we make in the early days of learning to sew ends up not being worn, but just remember that those projects were not a waste, for without them, you would have never learnt to sew at all.


'Lisette 1419' Dress

It took me about ten projects to reach a stage where I was totally happy with what I was creating. This may seem a lot, but remember I was only using cheap fabric and patterns from sewing books I'd bought, so the cost was relatively little. About four months in, I was creating garments that I still wear to this day, over a year and a half later. I wash my clothes on the delicate cycle of my washing machine, and I've never had a problem with the stitching coming undone. Have confidence in your own creations!


'New Look 6483' Top

Today, many sewing techniques are second nature to me, and I can put a dress together from start to finish in about six hours. I'm a relatively quick sewist though, so don't be put off if your projects take you a lot longer to complete than that - everyone works at different speeds. Of course, there's still so much more for me to learn, and things do still go wrong! My advice would be to always keep an un-picker close to hand. The beautiful thing about sewing is that if your stitches are in the wrong place, you can always undo them and try again. One mistake doesn't have to spoil your whole project!


'Sewaholic Cambie' Dress

You'll be pleasantly surprised at how quickly you can get the hang of using a sewing machine. Threading your machine may take you ten minutes as a beginner, but within a couple of projects you'll be down to less than a minute. That feeling of achievement is hard to beat! Same with sewing pattern instructions - you may have no clue what right sides together, facing, tuck, baste or gather mean now, but believe me, you'll be rattling off sewing terms within no time at all. It just takes practice.


'Sewaholic Renfrew' Dress

I hope this has given you the confidence to give sewing a try - if you're interested in giving it a go, you might be interested to know that me and Medi, our chairperson, are running a four week dressmaking course in Semester 2! These sessions will be totally separate from the Craft Society meetings, and will take place on Wednesday and Thursday nights (you only have to attend one a week - we just thought having a choice of days would make it easier for people to find time to come along). If this is something you'd be interested in, do let us know, and we'll give you more details closer to the time!

Thank you so much for reading,

Beth x

If anyone's interested, you can check out a list of all my completed sewing projects here, and my own sewing blog can be found here.

Saturday, 31 October 2015

Happy Halloween!

Did you come to our Halloween workshop this week? Our Fundraising Executive Emma Newman helped everyone to make wizard wands! They're easy to make yourself with a wooden chopstick or bamboo cane, glue gun or PVA glue, some brown paint and a few beads! 

All you need to do is create a 'handle' on your wand by making a spiral of glue from the bottom of your chopstick/cane to about a quarter of the way up. Add some beads, leave this to dry, then get painting! You can decorate it in any way you like - I think the brown wands with touches of gold paint look especially fabulous. 

Here are a few pictures to get you inspired: 


Thank you to everyone who came, we hope you had a good time! For those of you celebrating Halloween, have an awesome, spooky night :) 

Monday, 26 October 2015

Society Hoodies!

Hello everyone!

I'm so pleased to announce that this year's society hoodies are finally available for order - but not only can you order a hoodie, but also a sweatshirt or t-shirt if either take your fancy!

We're just getting an idea of numbers at the moment, so if you're interested hop on over to the Facebook group and comment on my post over there with which garments you'd be interested in. Approximate pricings are £20 for a hoodie, £14 for a sweatshirt and £10 for a t-shirt, but these will be confirmed within the next couple of weeks.

The size range for each garment is 8-16. If you need a bigger size, don't hesitate to get in contact (my email is hiu49c) and let me know, but there may be a small additional charge.

Everything will have the Craft and Sewing Society logo printed on the back in black and white, with the Bangor University logo embroidered onto the front left hand side.

Here are a few pictures of the products so you know what to expect...


If you click on each of the photo's descriptions it will take you to the webpage we are ordering them from, where you can get a better idea of which colours are available.

Everything should be ready to be officially ordered within the next couple of weeks, so if you are interested in ordering something, keep your eye out for a message from me containing all the information you need including which colours are available, which size to order and definite prices. Then you'll need to get back to me with your colour choice, size and payment within 1-2 weeks!

Thanks for bearing with me through the ordering process, I know it can be frustrating, but at least we'll all come out with lovely new society clothes at the end of it! (although part of me feels those hoodies should be self sewn... ;) )

Beth :)

Friday, 23 October 2015

Why More Young People Should Learn To Sew

Hello!

For those of you who know me, you're probably already aware that I sew most of my own clothes. I'm a completely self taught sewer (and avid sewing blog follower), inspired to get to grips with a sewing machine after watching the first series of The Great British Sewing Bee in 2013. I've been sewing for nearly two years now, and still get the same feeling of excitement and accomplishment every time I complete a new garment.

Unfortunately, for many young adults the sewing machine still appears to be viewed as something only used by the older generation, but it doesn't have to stay this way! I emailed the lovely Tilly Walnes, author of the blog Tilly and the Buttons, sewing pattern designer and contestant on The Great British Sewing Bee, to ask for her opinion. This is what she had to say:

"Sewing isn't just for grandmas (not that there's anything wrong with grandmas) - it's a post-apocalyptic life skill. Maker culture is thriving - from growing your own food to building your own treehouse, engineering a robot to sewing your own dresses - as people seek an antidote to fast fashion and consumer culture, and take pleasure in the satisfaction of making something with your own hands. Making your own clothes - and actually wearing them out in public - is one of the most fulfilling things you can do!"

As Tilly mentions, there's recently been a huge revival in the creative industry, fuelled by an obvious desire to escape our increasingly technological world, as well as people making a change to their consumerist lifestyles - sewing your own clothes is not only fun, it's also far more ethical than buying a cheaply made garment from a fast fashion chain store.

It can also be difficult to develop an individual style when the only choices of clothes you have are being provided by high street stores. When you sew your own, the garment, pattern, fabric choice and design details are all down to you, so you can make a piece of clothing that is exactly how you want it, fitted to tailor your exact measurements.

So, I'm on a mission to get more people sewing. If you'd like to have a go at using a sewing machine or sewing your own clothes, don't hesitate to ask me for help! The society has several machines that our members are welcome to use (we'll be having a workshop teaching you how to use them next semester), and which I'm happy to teach you with. If you'd like to get together for help with me at any point, just drop me a message and we can arrange a sewing night!

Lets get the world sewing, yeah?

Beth :)

(Thank you to Tilly Walnes for contributing to this post, and if anyone's interested, my own sewing blog can be found here.)

Monday, 19 October 2015

Tutorial: Knitting

For those of you who attended last week's workshop, you'll know we were learning how to knit! For anyone still in need of a few pointers, I've pulled together some links to YouTube tutorials which should be able to get you going on your first few stitches...

-How to Cast On Your Stitches

-How to Knit

-How to Purl (remember, to create a purl effect you will need to start by knitting the first row, then purling the second row. Continue with this 'knit one, purl one' until you reach the end of your design. When you reach the end of the pattern, be sure to finish on a purl row)

-How to Cast Off Your Stitches

-Knit Two Together (Decrease)

Of all the videos I found, these ones seemed to explain the knitting process most clearly, but if you're having any difficulties with your project feel free to look around for more sources of information, or just ask our committee members Beth and Emma, who can both help you out with any knitting questions you may have!

Once you've built up your knitting confidence, it would be great if you could make a couple of little woollen hats for the Big Knit campaign! There will be prizes given out in next week's meeting for the Most Hats Knitted and the Most Creative Hat, so get your stitch on and help to raise some money for charity. There's lots of inspiration and instructions here.

Finally, do remember that tonight (Monday 19th) is the first society social of the year! It will be held in Bar Uno on Friddeodd Site from 6pm onwards, where everyone will be able to eat, have a drink and get to know each other. Do come along, and simply ask for the Craft and Sewing Society at the bar if you're unsure where we're sitting! We can't wait to see you all there.

Happy knitting!

Friday, 9 October 2015

Tutorial: Dream-Catchers

In this week's workshop we made dream-catchers! It was so packed that we had to split the group between two rooms, but it seemed like everyone who came enjoyed themselves despite the slightly hectic start, so thank you everyone for being so patient! 

If you missed this week's meeting or simply want a reminder, here's a tutorial on how to make your very own dream-catcher. 

Materials 

-Metal, wire or wooden hoop (ours were 5 inches in diameter but you can use any size you like) 
-Wool in 2-3 colours, a metre of each 
-1 bead 
-Needle (a darning needle will be easier to thread the wool through because of the larger eye) 
-Feathers (optional) 

Instructions 


Using your first string of wool, tie a knot around your ring. 


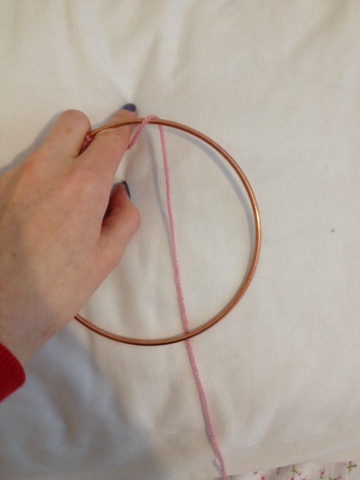
Stick your finger through your hoop from front to back. 


Put your string of wool over the hoop, as shown in the picture above. 


In the gap between your wool and finger, pull the end of the wool back through that hole from back to front. 


Pull tight. 


Continue making these knots around the ring, leaving a few centimetres between each one. If you make your final knot over the first one, you will make them more secure. Aim to make 7-11 knots. The more there are, the more intricate your dream-catcher will be. 


Now you've made your knots around the hoop, you need to continue these knots round the yarn rather than the hoop. To start, put the end of the string of wool through the first gap between knots from front to back. 


Now pull your wool back through the loop as shown in the picture. 

Pull it taut to create a triangular shape. 


Continue working your way around the hoop, knotting into each triangle. 


When you get back round to the beginning, you need to continue to create knots. 


Use this little triangle, pointed out in the photo, in order to join the second and third rounds. 


It should be looking a little like this. 


Continue knotting from triangle to triangle. 


If you want, you can continue working in a single colour until the centre, but you could also add a second colour. 


If you choose to add a second colour, simply tie a double knot between the two yarns and trim the ends. 


The triangles will be getting smaller and smaller the closer you get to the centre, so just be patient and take your time as you continue to knot and pull tightly. 


When you feel your pattern is nice enough, thread a needle onto your yarn and then pull through a bead, which will sit in the centre. 


Slide the bead up the yarn and position it how you like. 


Tie off the end of your wool by creating a stitch in the web of your dream-catcher and passing your needle back through this looped stitch before pulling tightly. 


Using another coloured yarn, wrap it around the hoop of your dream-catcher, beginning by tying a knot so it doesn't come undone. 


Once you've tied off the yarn covering the hoop, add a loop by which to hang it. 


If you want, add some feathers to the bottom of your dream-catcher for decoration. You can also add beads, buttons, sequins...use your creativity! 

And voila! Your very own dream-catcher. 

If you need some more inspiration, take a look at some of the dream-catchers made by our members at this week's workshop: 


Happy crafting! 

Monday, 5 October 2015

Tutorial: Jam Jar Tea-Light Holders

Making a jam jar tea-light holder is super easy, but for anyone a little unsure of the materials you need to create your own, we've put together a little tutorial to help you out. 

Materials 

-Clean glass jar, whatever size you like! 
-Acrylic or glass paint 
-Paintbrush
-Pot of clean water
-Outliner paint, usually found in a squeezy tube (optional) 
-Tea-light 

Instructions 

1. If you're not using outliner, skip straight to step 3. If you are using outliner to draw shapes which you can then fill in with paint later, this is the time to create your design. Carefully apply the outliner onto the jar directly from the tube, being careful not to squeeze too hard! 

2. Wait for the outliner to fully dry. 

3. Paint your design! Using acrylic or glass paint, you can create any patterns or shapes you like - if you've used outliner, fill in the shapes you've made with paint which will create lovely coloured shadows once the tea-light is lit.

4. Wait for the paint to dry. 

5. Pop in a lit tea-light and admire your handiwork! This project is perfect for creating a lovely warm glow on a cold autumn evening. 

And there you have it! A quick and easy project which will help bring new life to an old jam jar, which otherwise would only be thrown away. If you're stuck for design ideas, take a look below at some of the jars which were painted at our taster session last week: 


Happy painting!