I hope that you all managed to attend our taster session yesterday, but for those of you that couldn't make it, I've put together a tutorial so you can have a go at making your own pencil case! You can also find a video with all the instructions here if you need any extra guidance.
Materials:
-20x20cm piece of fabric (PVC is preferable but you can use anything - cotton, denim, cord, etc)
-1x23cm zip
-Thread
-Needle
-Masking Tape
Instructions:
1. With your fabric facing pattern-side up, masking tape your zip face-down, so that the edges of the zip and fabric line up
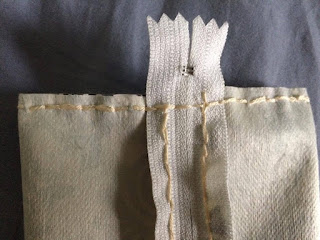
2. Using a running stitch, simply sew along the side of the zip. Once you reach the other end, turn and sew back the way you came, filling the gaps (see below)

3. Remove the masking tape from the zip, then fold the fabric in half so that the patterned side is touching, aligning the other side of the zip with the fabric. Masking tape the edges to keep it in place whilst you sew
4. Like the first side of the zip, sew along the zip from one side to the other and then back again
5. You should now have a tubular piece of fabric. Remove the masking tape from the sides of the fabric, then lay flat so the zip is central. Unzip the zip halfway, and masking tape the open zip ends to keep them together
6. Sew along one end of the pencil case
7. Sew along the other edge of the pencil case. You should now be left with a pencil case, which is inside out!
8. Open the zip all the way and turn the pencil case right side out, pushing out the corners
9. Ta-da! You have a lovely handmade pencil case :)
Thank you to everyone who came to our taster session. Next week we will be making scratch off maps, 7pm on Tuesday in the Seminar Room of the Wheldon Building. If you don't know where to go, just drop us a message via the Facebook page (link in the navigation bar above!)
Happy crafting everyone!


No comments:
Post a Comment